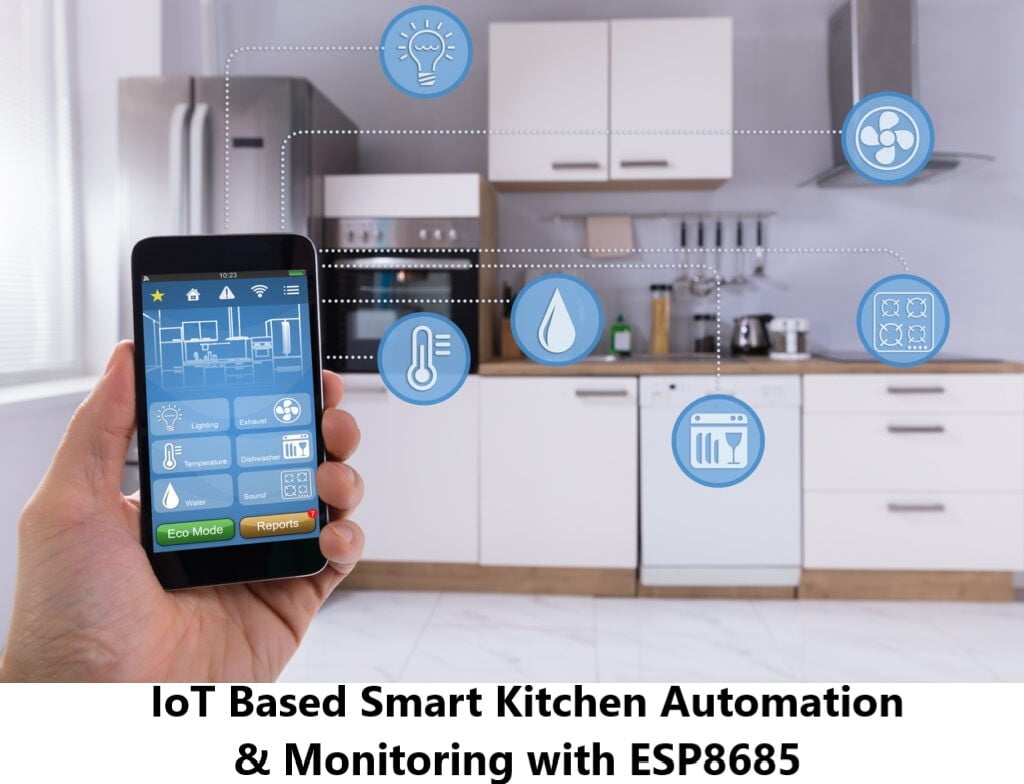
In this blog, we will build an IOT based smart kitchen using ESP8685. Our purpose from this project is to automate the basic Kitchen loads and real time monitor them using ESP8685. A home's kitchen holds significant importance, serving as a central hub for daily activities. Ensuring safety remains paramount during any kitchen-related tasks. Swift identification and resolution of issues such as gas leaks, uncontrolled fires, high temperatures, and excessive moisture are critical. Additionally, the remote monitoring and control of kitchen appliances such as lighting, refrigerators, ovens, etc., become imperative. The primary objective of this blog is to develop a prototype for a Smart Kitchen leveraging IoT (Internet of Things) technologies.
In this project we will control a kitchen load through a relay connected to ESP8685, so you can connect multiple loads in the kitchen like refrigerator, water purifier, ventilation system, kitchen lights, etc.
We’ll take a look at how to connect the relay to the ESP8685 and build a web server to control a relay remotely (or as many relays as you want).
Hardware Requirements and Software Requirements
Hardware Requirements:

Bulb as Load
Software Requirements:
Arduino IDE
Wiring a Relay Module to the ESP32
Connect the relay module to the ESP8685 as shown in the following diagram. The diagram shows wiring for a 2-channel relay module,
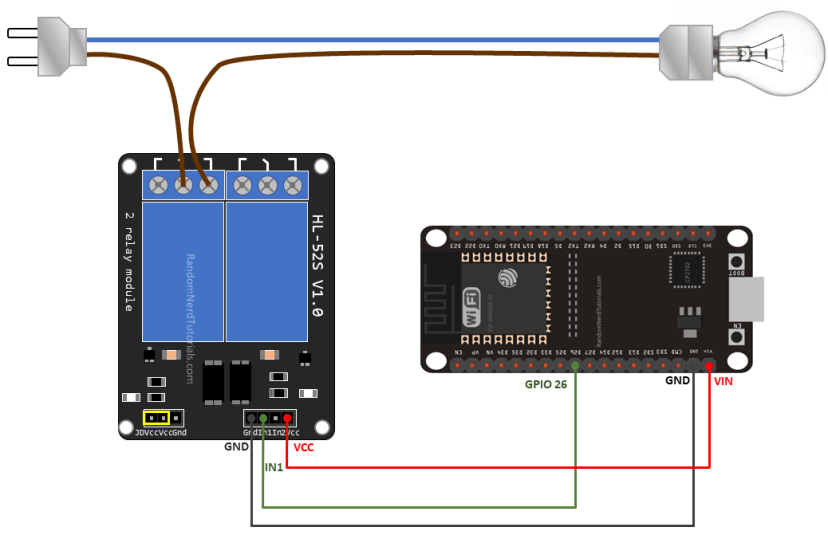
We’re connecting the IN1 pin to GPIO 26, you can use any other suitable GPIO. Here we are using Lamp, for trial, after proper testing you can connect multiple kitchen loads with multiple relays.
After successful connection, upload the following code in ESP8685. Through this we will send a LOW signal to let the current flow, and a HIGH signal to stop the current flow. Also we will control this relay with help of ESP8685 web server.
Code:
#include "WiFi.h"
#include "ESPAsyncWebServer.h"
// Set to true to define Relay as Normally Open (NO)
#define RELAY_NO true
// Set number of relays
#define NUM_RELAYS 5
// Assign each GPIO to a relay
int relayGPIOs[NUM_RELAYS] = {2, 26, 27, 25, 33};
// Replace with your network credentials
const char* ssid = "CampusComponent";
const char* password = "CampusComponent";
const char* PARAM_INPUT_1 = "relay";
const char* PARAM_INPUT_2 = "state";
// Create AsyncWebServer object on port 80
AsyncWebServer server(80);
const char index_html[] PROGMEM = R"rawliteral(
<!DOCTYPE HTML><html>
<head>
<meta name="viewport" content="width=device-width, initial-scale=1">
<style>
html {font-family: Arial; display: inline-block; text-align: center;}
h2 {font-size: 3.0rem;}
p {font-size: 3.0rem;}
body {max-width: 600px; margin:0px auto; padding-bottom: 25px;}
.switch {position: relative; display: inline-block; width: 120px; height: 68px}
.switch input {display: none}
.slider {position: absolute; top: 0; left: 0; right: 0; bottom: 0; background-color: #ccc; border-radius: 34px}
.slider:before {position: absolute; content: ""; height: 52px; width: 52px; left: 8px; bottom: 8px; background-color: #fff; -webkit-transition: .4s; transition: .4s; border-radius: 68px}
input:checked+.slider {background-color: #2196F3}
input:checked+.slider:before {-webkit-transform: translateX(52px); -ms-transform: translateX(52px); transform: translateX(52px)}
</style>
</head>
<body>
<h2>ESP Web Server</h2>
%BUTTONPLACEHOLDER%
<script>function toggleCheckbox(element) {
var xhr = new XMLHttpRequest();
if(element.checked){ xhr.open("GET", "/update?relay="+element.id+"&state=1", true); }
else { xhr.open("GET", "/update?relay="+element.id+"&state=0", true); }
xhr.send();
}</script>
</body>
</html>
)rawliteral";
// Replaces placeholder with button section in your web page
String processor(const String& var){
//Serial.println(var);
if(var == "BUTTONPLACEHOLDER"){
String buttons ="";
for(int i="1;" i<=NUM_RELAYS; i++){
String relayStateValue = relayState(i);
buttons+= "<h4>Relay #" + String(i) + " - GPIO " + relayGPIOs[i-1] + "</h4><labelswitch\""><input type="\"checkbox\""to"ggleCheckbox(this)\""" + String(i) + "\" "+ relayStateValue +"><spanslider\""></span></label>";
}
return buttons;
}
return String();
}
String relayState(int numRelay){
if(RELAY_NO){
if(digitalRead(relayGPIOs[numRelay-1])){
return "";
}
else {
return "checked";
}
}
else {
if(digitalRead(relayGPIOs[numRelay-1])){
return "checked";
}
else {
return "";
}
}
return "";
}
void setup(){
// Serial port for debugging purposes
Serial.begin(115200);
// Set all relays to off when the program starts - if set to Normally Open (NO), the relay is off when you set the relay to HIGH
for(int i="1;" i<=NUM_RELAYS; i++){
pinMode(relayGPIOs[i-1], OUTPUT);
if(RELAY_NO){
digitalWrite(relayGPIOs[i-1], HIGH);
}
else{
digitalWrite(relayGPIOs[i-1], LOW);
}
}
// Connect to Wi-Fi
WiFi.begin(ssid, password);
while (WiFi.status() != WL_CONNECTED) {
delay(1000);
Serial.println("Connecting to WiFi..");
}
// Print ESP32 Local IP Address
Serial.println(WiFi.localIP());
// Route for root / web page
server.on("/", HTTP_GET, [](AsyncWebServerRequest *request){
request->send_P(200, "text/html", index_html, processor);
});
// Send a GET request to <ESP_IP>/update?relay=<inputMessage>&state=<inputMessage2>
server.on("/update", HTTP_GET, [] (AsyncWebServerRequest *request) {
String inputMessage;
String inputParam;
String inputMessage2;
String inputParam2;
// GET input1 value on <ESP_IP>/update?relay=<inputMessage>
if (request->hasParam(PARAM_INPUT_1) & request->hasParam(PARAM_INPUT_2)) {
inputMessage = request->getParam(PARAM_INPUT_1)->value();
inputParam = PARAM_INPUT_1;
inputMessage2 = request->getParam(PARAM_INPUT_2)->value();
inputParam2 = PARAM_INPUT_2;
if(RELAY_NO){
Serial.print("NO ");
digitalWrite(relayGPIOs[inputMessage.toInt()-1], !inputMessage2.toInt());
}
else{
Serial.print("NC ");
digitalWrite(relayGPIOs[inputMessage.toInt()-1], inputMessage2.toInt());
}
}
else {
inputMessage = "No message sent";
inputParam = "none";
}
Serial.println(inputMessage + inputMessage2);
request->send(200, "text/plain", "OK");
});
// Start server
server.begin();
}
void loop() {
}
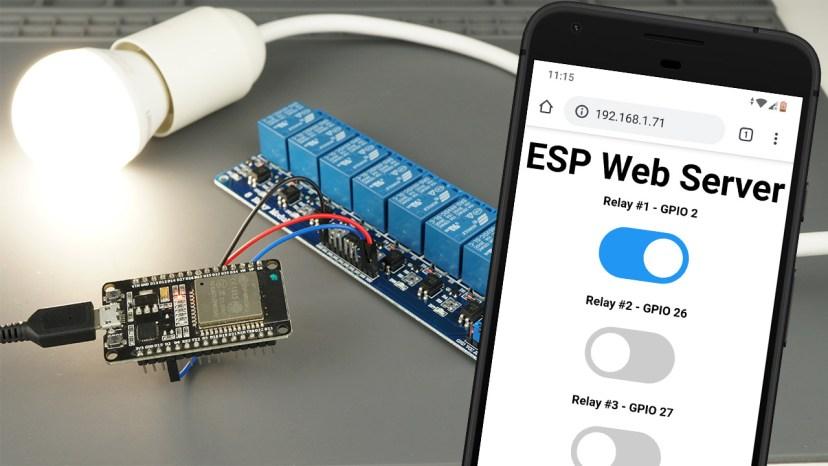
After uploading the code to ESP8685 will try to connect to the WIFI, it will provide you with an IP address, after connecting with the IP on your smartphone, you will get a screen like this:
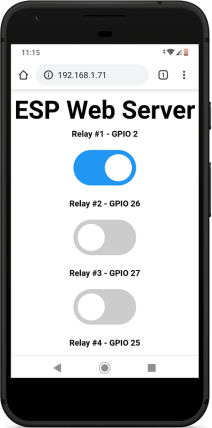
Now for testing you can press any button for turning ON and OFF the relay.
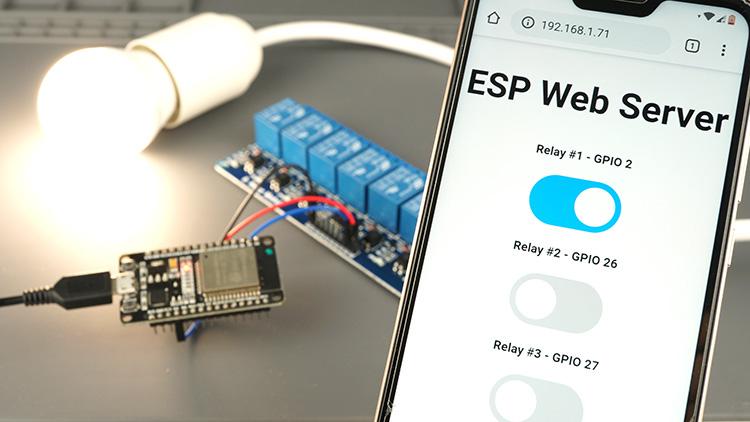
Now, you can use the onscreen buttons to control your Kitchen loads remotely using your smartphone, making your kitchen smart.
Conclusion
This is how you can design your own IoT Based Smart Kitchen using ESP8685 with Automation & Monitoring System using the ESP8685 web server. Further in this project you can try to incorporate multiple relays and multiple loads from the kitchen. Also you can interface sensors like Gas sensors to detect gas leaks in the kitchen, to make the system more advanced.

