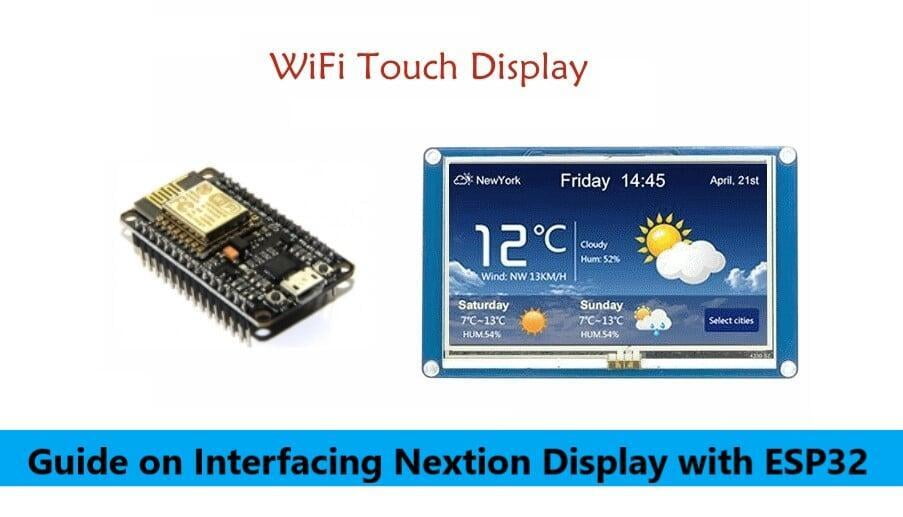
In this article we will interface Nextion Display with ESP32, we will see how to configure the display for the first time, download the needed resources, and how to integrate it with the ESP32 microcontroller board. The Nextion display is a powerful Human Machine Interface (HMI) solution that lets you create interactive graphical user interfaces (GUIs) for your embedded projects. When combined with the ESP32 microcontroller, you can develop user-friendly interfaces for various applications, including IoT devices, automation projects, and data visualization dashboards.
Hardware & Software Requirements to Interface Nextion Display with ESP32
Hardware:
Software:
Nextion Editor
Arduino IDE
Nextion Display Setup
Nextion Editor is a development software used for visual building of graphic interface for embedded/IOT/GUI-intensive devices with various types of TFT displays and Touch Panels. Using this software, we can start creating user interfaces for TFT based devices in a faster and easier way.
You can download Nextion Editor from this link
https://nextion.itead.cc/resources/download/nextion-editor/
After downloading the editor install the nextion editor .
Nextion Editor General Overview
Here’s a quick overview of the different sections of the Nextion Editor.
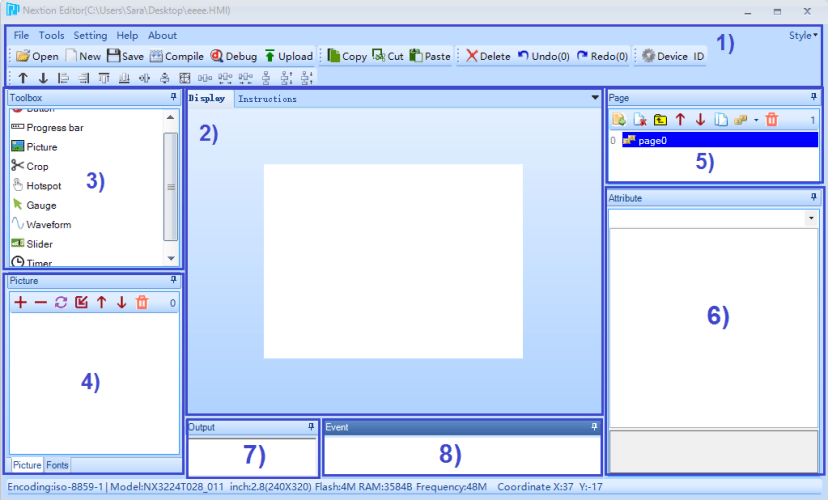
Main Menu
Canvas – this is where you add your components to build the User Interface.
Toolbox – this is where you have a wide variety of components you can add to the user interface, like pictures, progress bar, buttons, sliders, and much more.
Picture/Fonts list – this shows the fonts and pictures imported to your projects. Here you can also add new fonts and pictures.
Page area – you can manage your pages here, like add more pages, copy and delete pages.
Attributes area – this part shows your component’s attributes. You can edit the component’s attributes here.
Compiler output window – this will show any errors occurred during compiling.
Event window – here you can add code to be run when an event is met.
Interfacing ESP32 with Nextion Display
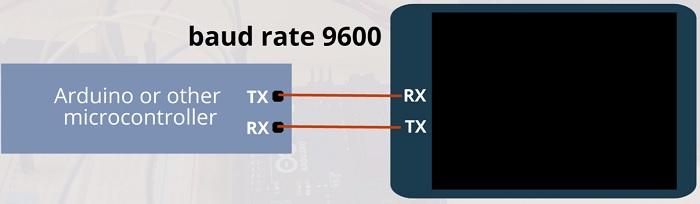
Connect the Nextion display to the ESP32:
Connect the TX pin of the Nextion display to the RX pin of the ESP32 (e.g., ESP32 Tx0 to Nextion Rx).
Connect the RX pin of the Nextion display to the TX pin of the ESP32 (e.g., ESP32 Rx0 to Nextion Tx).
Use the jumper wires to connect the GND pins of both devices.
Configure the Nextion display:
Open the Nextion Editor and create a new project.
Select the model of your Nextion display.
Design your desired interface using the built-in components like buttons, text boxes, images, and progress bars.
Assign unique IDs to each component for interaction with the ESP32 code.
Example User Interface designed in Nextion Editor:
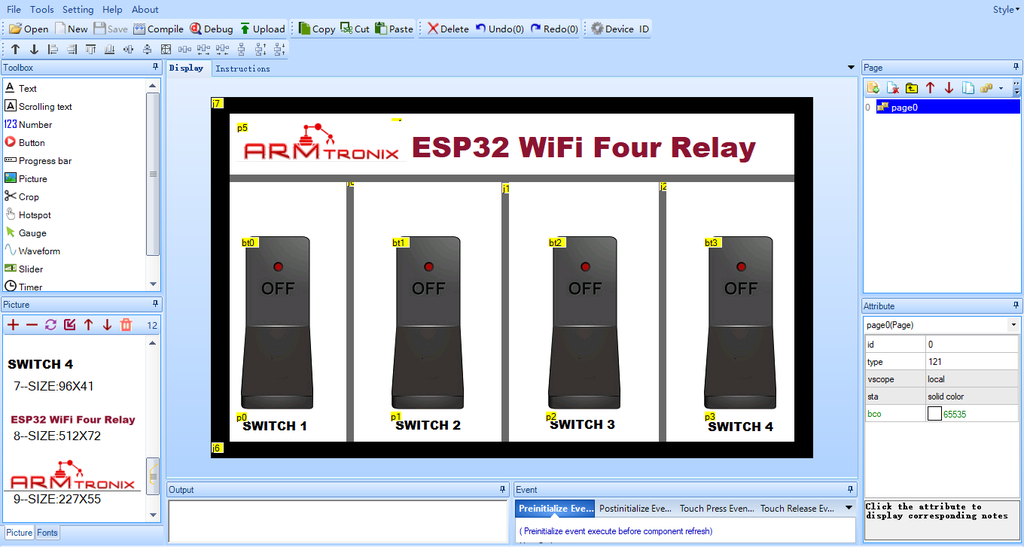
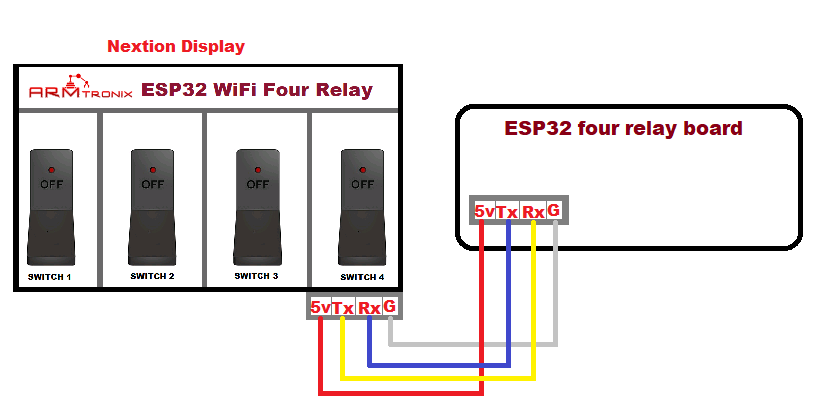
The above image shows the connection diagram of ESP 32 wifi four relay board with the nextion display.From the ESP 32 board J1 and J2 connect 5v and Ground(G) to the nextion display as show below.Connect Tx of nextion to the Rx0 of the ESP32 board and Rx of nextion to the Tx0 of the ESP32 board .This will establish Uart communication.
Example Code to Show Temperature, Humidity and State of Button on Nextion Display
#include "Nextion.h"
#include "DHT.h"
#define DHTPIN 4 // what digital pin we're connected to
// Uncomment whatever type you're using!
#define DHTTYPE DHT11 // DHT 11
//#define DHTTYPE DHT22 // DHT 22 (AM2302), AM2321
//#define DHTTYPE DHT21 // DHT 21 (AM2301)
// Initialize DHT sensor.
DHT dht(DHTPIN, DHTTYPE);
// LED pins
const int led1 = 8;
const int led2 = 9;
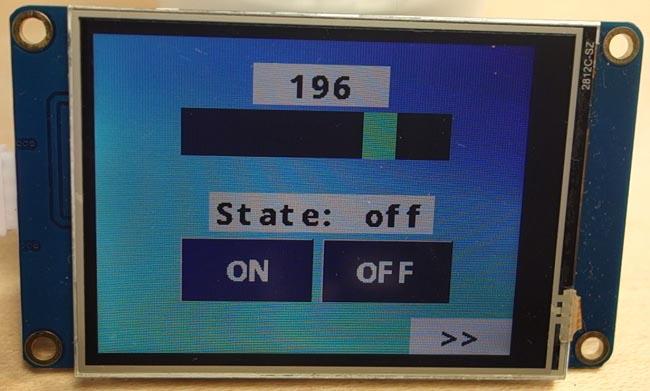
// Declare your Nextion objects - Example (page id = 0, component id = 1, component name = "b0")
NexText tState = NexText(0, 4, "tState");
NexButton bOn = NexButton(0, 2, "bOn");
NexButton bOff = NexButton(0, 3, "bOff");
NexSlider h0 = NexSlider(0, 5, "h0");
NexText tSlider = NexText(0, 6, "tSlider");
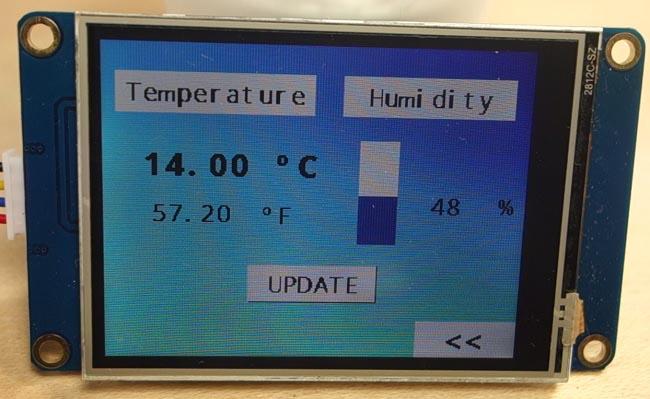
NexText tTempC = NexText(1, 5, "tTempC");
NexText tTempF = NexText(1, 4, "tTempF");
NexProgressBar jHumidity = NexProgressBar(1, 8, "jHumidity");
NexText tHumidity = NexText(1, 9, "tHumidity");
NexButton bUpdate = NexButton(1,10, "bUpdate");
// Register a button object to the touch event list.
NexTouch *nex_listen_list[] = {
&bOn,
&bOff,
&h0,
&bUpdate,
NULL
};
/*
* Button bOn component pop callback function.
* When the ON button is released, the LED turns on and the state text changes.
*/
void bOnPopCallback(void *ptr) {
tState.setText("State: on");
digitalWrite(led1, HIGH);
}
/*
* Button bOff component pop callback function.
* When the OFF button is released, the LED turns off and the state text changes.
*/
void bOffPopCallback(void *ptr) {
tState.setText("State: off");
digitalWrite(led1, LOW);
}
/*
* Slider h0 component pop callback function.
* When the slider is released, the LED brightness changes and the slider text changes.
*/
void h0PopCallback(void *ptr) {
uint32_t number = 0;
char temp[10] = {0};
// change text with the current slider value
h0.getValue(&number);
utoa(number, temp, 10);
tSlider.setText(temp);
// change LED brightness
analogWrite(led2, number);
}
/*
* Button bUpdate component pop callback function.
* When the UPDATE button is released, the temperature and humidity readings are updated.
*/
void bUpdatePopCallback(void *ptr) {
// Reading temperature or humidity takes about 250 milliseconds!
// Sensor readings may also be up to 2 seconds 'old' (its a very slow sensor)
float h = dht.readHumidity();
// Read temperature as Celsius (the default)
float t = dht.readTemperature();
// Read temperature as Fahrenheit (isFahrenheit = true)
float f = dht.readTemperature(true);
// Check if any reads failed and exit early (to try again).
if (isnan(h) || isnan(t) || isnan(f)) {
return;
}
// Update temperature in Celsius
static char temperatureCTemp[6];
dtostrf(t, 6, 2, temperatureCTemp);
tTempC.setText(temperatureCTemp);
// Update humidity percentage text and progress bar
char hTemp[10] = {0};
utoa(int(h), hTemp, 10);
tHumidity.setText(hTemp);
jHumidity.setValue(int(h));
// Update temperature in Fahrenheit
static char temperatureFTemp[6];
dtostrf(f, 6, 2, temperatureFTemp);
tTempF.setText(temperatureFTemp);
}
void setup(void) {
dht.begin();
Serial.begin(9600);
// You might need to change NexConfig.h file in your ITEADLIB_Arduino_Nextion folder
// Set the baudrate which is for debug and communicate with Nextion screen
nexInit();
// Register the pop event callback function of the components
bOn.attachPop(bOnPopCallback, &bOn);
bOff.attachPop(bOffPopCallback, &bOff);
h0.attachPop(h0PopCallback);
bUpdate.attachPop(bUpdatePopCallback, &bUpdate);
// Set LEDs as outputs
pinMode(led1, OUTPUT);
pinMode(led2, OUTPUT);
}
void loop(void) {
/*
* When a pop or push event occured every time,
* the corresponding component[right page id and component id] in touch event list will be asked.
*/
nexLoop(nex_listen_list);
}
Working of the Project
Once the hardware is connected and the software is programmed, the ESP32 communicates with the Nextion display through serial communication. The ESP32 sends commands to the display, telling it what to display and how to respond to user input. The Nextion display then updates its GUI and sends back any user interactions to the ESP32 for further processing.
You May Also Like To Read: AT Commands, Call and SMS Using A7672S 4G GSM with Nuvoton Microcontroller
Conclusion
In this post we have seen the interfacing of Nextion display with ESP32, following the above tutorial you can explore multiple dimensions of Nextion Display and as well of ESP32. Nextion is a great display that makes the process of creating user interfaces simple and easy. Campus Component offer a diverse range of components to fuel your innovation. If you're ready to elevate your projects with the seamless synergy of Nextion Displays and ESP32, and many other electronic components, visit Campus Component today and buy electronic components online in India.

