Nuvoton Technology Corporation is a leading semiconductor manufacturer that provides a wide range of microcontrollers (MCUs). Their 32-bit MCUs are based on the ARM Cortex-M architecture and offer a high level of performance, flexibility, power efficiency, provide exceptional performance, low power consumption, and advanced peripherals.
In this blog post, we will provide a step-by-step guide on how to get started with Nuvoton 32-bit microcontrollers.
Nuvoton's 32-bit microcontrollers offer a wide selection of ARM Cortex-M0, M4, and M23 cores, catering to various application requirements. These controllers are known for their rich features, including high-speed interfaces, analog peripherals, real-time control capabilities, and robust security features.
In this blog we will discuss the Nuvoton N76E003 Development Board. Here, we will learn how to set-up the N76E003 programming environment as well as how to write the program and blink an LED.
Overview of N76E003
N76E003 – a 1T-8051 based series MCU, offers 18 KB Flash ROM, configurable Data Flash and 1 KB SRAM .
It supports wide operating voltage of 2.4V to 5.5V
Temperature range of - 40 ℃ to 105 ℃ ,
High noise immunity of 7 kV ESD
The N76E003 provides up to 18 I/O pins under 20 pin packages and rich peripherals including two UART s, SPI , I²C , 6-ch PWM output, wake-up function, and Brown-out detector.
The competitive features includes a high precision <2 % deviation 16 MHz Internal RC oscillator, and a high resolution 12-bit 8 channel ADC .
N76E003 supports small form factor packages TSSOP20 ( 4mm x 6.5mm ) and QFN20 ( 3mm x 3mm ) for easy board design.
Key Features of N76E003
• | Core | ||
| - | 1T 8051 processor | |
| - | Max frequency up to16 MHz | |
| - | Wide operating voltage: 2.4V to 5.5V | |
| - | Temperature range: - 40 ℃ to 105 ℃ | |
| |||
• | Memory | ||
| - | 18 KB of Flash memory | |
| - | 1 KB of SRAM | |
| - | Supports configurable Data Flash | |
| - | Supports program update by: ISP ( In-System Programming ) ICP ( In-Circuit Programming ) IAP ( In-Application Programming ) | |
|
|
| |
• | PWM | ||
| - | Up to 6-ch PWM | |
| - | Programmable dead-zone generator | |
|
| ||
• | ADC | ||
| - | 12-bit 8-ch ADC | |
| - | Runs up to 500 kSPS | |
|
| ||
• | Connectivity | ||
| - | Two UART s up to 115200 bps | |
| - | One SPI up to 8 MHz | |
| - | One I²C up to 400 kHz | |
|
|
| |
• | Clock Control | ||
| - | 2 % deviation16 MHz Internal RC oscillator | |
| - | 10 kHz Internal RC oscillator |
Applications of N76E003
There are several applications of N76E003 such as Access Control System, Thermostat, Bluetooth Speaker, Electric Meter, Data Collector, Battery charger, Beauty Equipment, Small Home Appliance, etc.
Now Let’s Set Up Our Development Environment
To begin your Nuvoton 32-bit microcontroller project, you'll need the right tools. Ensure you have the following:
1. Hardware:
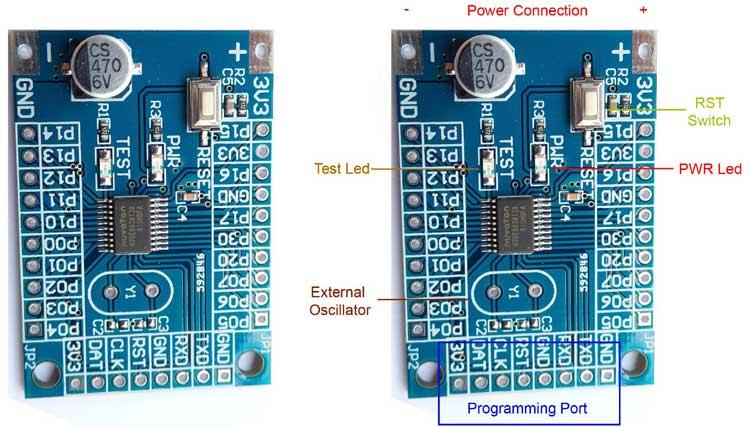
The official development board for Nuvoton N76E003 is the NuTiny-N76E003 SDK board with a programmer.
2. Software Development Kit (SDK):
Download the softwares listed below
Board Support Package for Keil - N76E003
Keil Micro Vision - C51 (IDE with Compiler)
3. Integrated Development Environment (IDE):
Download and install Keil Micro Vision and C51 Compiler which is used to compile code for 8051 architecture.
To flash the program to the microcontroller we will use Nu-link Keil driver interface.
Other than the compiler and IDE, install the Board Support Package (BSP) Library for N76E003.
Lets Now Start Coding
Now after successfully getting all your hardware and software requirements and finishing their downloading and installing process we can start building our first project i.e Blinking an LED.
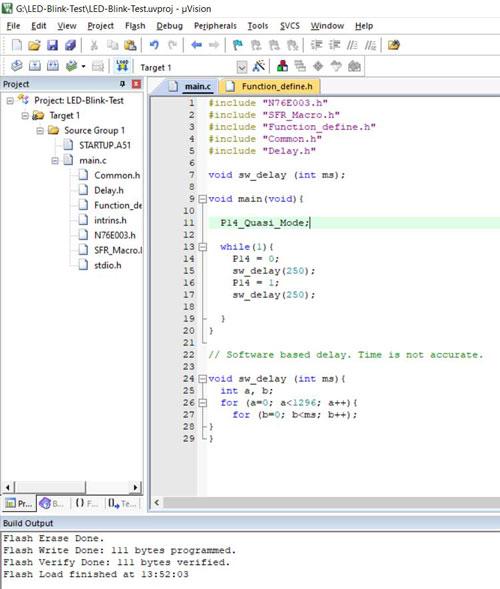
Open Keil uVision and select the proper boards and upload method, and paste the following code in the editor:
#include "N76E003.h"
#include "SFR_Macro.h"
#include "Function_define.h"
#include "Common.h"
#include "Delay.h"
void sw_delay (int ms);
void main(void){
P14_Quasi_Mode;
while(1){
P14 = 0;
sw_delay(250);
P14 = 1;
sw_delay(250);
}
}
// Software based delay. Time is not accurate.
void sw_delay (int ms){
int a, b;
for (a=0; a<1296; a++){
for (b=0; b<ms; b++);
}
}
Now compile this code and it should show output as follow:
Build started: Project: LED-Blink-Test
Build target 'Target 1'
assembling STARTUP.A51...
linking...
Program Size: data="9.0" xdata="0" code="118
creating hex file from ".\Objects\LED-Blink-Test"...
".\Objects\LED-Blink-Test" - 0 Error(s), 0 Warning(s).
Build Time Elapsed: 00:00:01
Now Let's Upload Code on N76E003 using Nu-Link
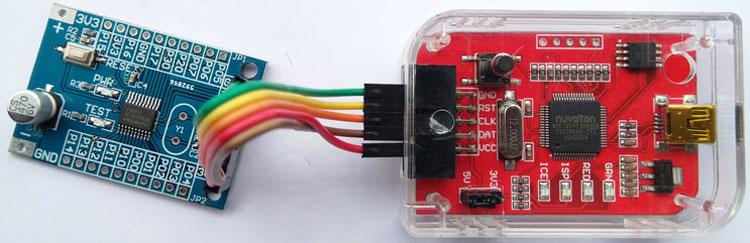
Connect the development board with berg pins. Check the connection properly and match it with the programmer and the development board pin names.
Connect the hardware into the USB pin of the PC. Make sure that the power led to the development board is glowing perfectly as shown below.
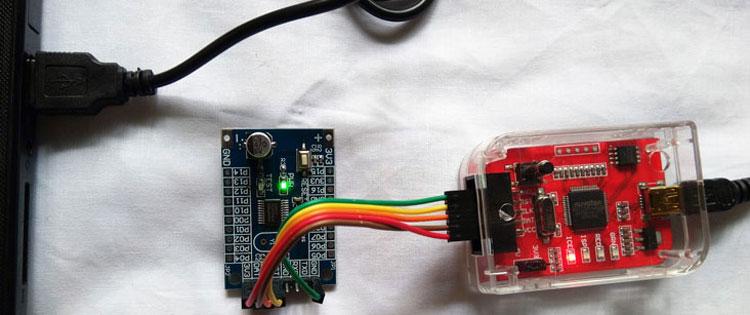
As shown in the above image, the PWR LED is glowing in Green color. Go to the Keil compilation toolbar. Press the Build target button and the load button.
The program will be loaded in the chip and the LED will start to blink as shown in the image below.

Conclusion:
In this blog post, we have provided a step-by-step guide on how to get started with a Nuvoton 32-bit microcontroller. Nuvoton 32-bit microcontrollers present vast possibilities for electronics enthusiasts, hobbyists, and embedded professionals. The Nuvoton’s 32 bit mcu modules can be used in varied applications such as Thermostat, Bluetooth Speaker, Infrared Sensing, Battery charger, Small IoT appliances. In terms of industrial projects we can use Nuvoton Module to build Rail safety devices, Infrared Astronomy, optical power meters and Large scale IoT projects.
If you are looking for electronic components and different microcontrollers from Nuvoton, reach out Campus Component today!

