
In today's industrial and factory operations, safety is the most important thing which is considered for people and the machineries, especially when it comes to detecting gas leaks. Gas leaks can cause serious risks, from potential fire hazards to health concerns. To address this, in this blog we will learn and build a Gas Leak Detection & Alarm System using the MQ2 sensor. This project provides a cost-effective and efficient solution to monitor gas levels and trigger alarms in case of leaks.
Overview of our Project
In this project, our goal is to make a Gas Leak Detection & Alarm System using the MQ2 Gas Sensor and Arduino UNO Board. The MQ2 sensor can spot different gases and even smoke.
This basic gas leak detection system will be built using Arduino Uno. We're using an MQ2 gas sensor along with an RGB LED to keep an eye on gas levels continuously. When the gas levels go beyond a certain limit, we'll sound an alarm using a buzzer, and the RGB LED will turn red to show it's dangerous. If the gas levels are safe, below the set limit, the system stays quiet, and the LED shows a green light, indicating it's safe.
Components Required for Gas Leak Detection Alarm System
MQ2 Gas Sensor
Arduino Uno (or any compatible microcontroller)
Buzzer
LED
Resistors
Connecting wires
Power source (battery or adapter)
You can get all the above components at a reasonable price at Campus Component Store.
Know About MQ2 Module Gas Sensor

The MQ2 sensor is widely used for gas leakage detection due to its high sensitivity to various gases such as alcohol, carbon monoxide, hydrogen, isobutene, LPG, propane, methane, alcohol, and smoke. It is affordable, easy to interface with any microcontroller, and offers reliable performance.
Specifications of MQ2 Sensor
Sensitivity: High to gases in the scope of detection
Sensing Resistance: 10 KΩ – 60 KΩ
Load Resistance: 20 KΩ
Heater Resistance: 33Ω ± 5%
Concentration Range: 200 – 10000 ppm
Heating Consumption: <800mw
Preheat Duration: 20 seconds (minimum)
Operating Temperature: -10 to 50 degrees Celsius
Operating Voltage: Typically 5V (with a preheat time of over 24 hours for initial use).
You May Also Like To Read: What are smart sensors
Working Principle of MQ2 Gas Sensor
The sensor consists of a sensing element, typically made of aluminium-oxide-based ceramic, coated with tin dioxide, and enclosed in a stainless steel mesh. The sensing element has six connecting legs. Two of these legs are responsible for heating the sensing element, while the other four are used for output signals.
When the sensing element is heated at high temperatures in the presence of air, oxygen gets adsorbed on its surface. This prevents the flow of current as donor electrons in tin oxide are attracted to the adsorbed oxygen.
In the presence of reducing gases, which are found in gas leaks, oxygen atoms react with these gases, reducing the surface density of the adsorbed oxygen. This allows current to flow through the sensor, generating analog voltage values.
The analog voltage values generated by the sensor are proportional to the concentration of gas present. Higher voltage values indicate a higher concentration of gas.
Connecting MQ2 Gas Sensor Module with Arduino
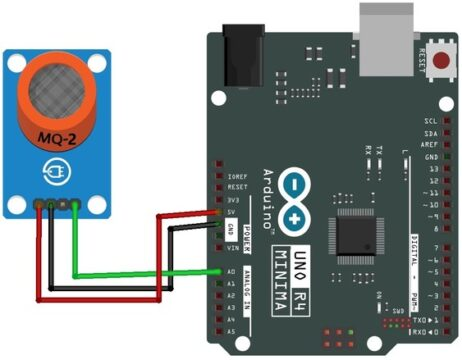
VCC pin of MQ-2 sensor -> 5V out pin on the Arduino.
GND pin -> GND of Arduino.
Analog output pin (A0) of the MQ-2 sensor -> A0 Pin of the Arduino.
Full Circuit with Alarm and LEDs:
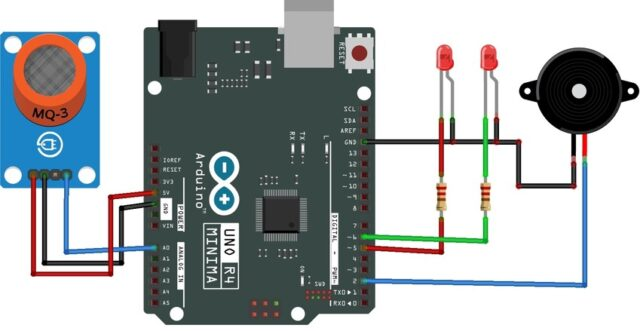
Connect the Red to digital pin 5 and Green LED to digital pin 6 using 330-ohm resistor.
Connect a 5V Buzzer to the Digital Pin 2 of the Arduino.
After Successfully building the circuit as shown in above image, upload the following code in Arduino using Arduino IDE.
Arduino Code
// Define the pin numbers for the Gas Sensor
const int sensorPin = A0;
int sensorValue;
// Define the pin number for the buzzer
const int buzzerPin = 2;
// Define pin numbers for the RGB LED
const int RPin = 5; // R channel of RGB LED
const int GPin = 6; // G channel of RGB LED
void setup() {
Serial.begin(9600); // Start serial communication at 9600 baud rate
// Initialize the buzzer and RGB LED pins as output
pinMode(buzzerPin, OUTPUT);
pinMode(RPin, OUTPUT);
pinMode(GPin, OUTPUT);
}
void loop() {
// Read the analog value of the gas sensor
sensorValue = analogRead(sensorPin);
// Print the sensor value to the serial monitor
Serial.print("Analog output: ");
Serial.println(sensorValue);
// If the sensor value exceeds the threshold, trigger the alarm and make the RGB LED red
if (sensorValue > 300) {
tone(buzzerPin, 500, 300);
digitalWrite(GPin, LOW);
digitalWrite(RPin, HIGH);
} else {
// If the sensor value is below the threshold, turn off the alarm and make the RGB LED green
noTone(buzzerPin);
digitalWrite(RPin, LOW);
digitalWrite(GPin, HIGH);
}
// Wait for 50 milliseconds before the next loop iteration
delay(50);
}
Code Explanation
Above code we can see in loop:
We are reading sensor values-
If the sensor value < 300 then the alarm is in off state and Green LED indication is turned ON.
If the sensor value > 300 then the alarm gets triggered and makes the Red LED glow.
Testing
1. At lower gas level, the green LED turns ON and the alarm sound is turned off.
2. At higher gas values, the alarm is turned ON, and the RGB LED turns red.
Conclusion
Thus we have successfully implemented the Gas Leak Detection and Alarm using MQ2 sensor. This project is enjoyable and simple to build and understand. By following the above instructions, you can make your own personalized Gas Leak detection system as per your application and need. Also remember to focus on safety while you're building and setting up the system. If you implement and maintain it properly, this system can lower the chances of gas leaks, making the surroundings safer for everyone.
If you are looking to implement or build the Gas Leak Detection and Alarm using MQ2 Sensor and looking for required components like sensors and different microcontrollers from brands such as Winsen, Arduino, Espressif, Nuvoton, visit the best online electronic components store in India - Campus Component today.

